7 incredibly useful ways to use Apple’s Notes app
While you likely use Notes consistently, you may not recognize this app is more than a mere place to write and store quick comments or grocery lists. It’s a powerful assistant; however, if you prefer physical notes, tap or click to get a pint-sized smart printer. But for digital note-taking, Notes reigns superior.
Without question, Notes is one of the most reliable apps offered by Apple and, thanks to iOS 13, this handy application takes the art of note-taking to another level. To help you realize its potential, here are seven tips and tricks you’ll use every day.
If you have used Apple Notes before, you know the app has no problem searching typed or handwritten text. What the program couldn’t search were images, but that changed with iOS 13.
Type in your specific term in the search bar and Notes will return all instances of the word from text entries, images and saved scanned documents, such as receipts.
2. Improved organization
Before the iOS 13 update, the folder organization was basic. Folders were only located in one place. Boring! But now you can move any folder, as long as it’s stored on your device or iCloud.
To move a folder, press down on it and drag it to a new location. The folder turns into a subfolder if you drop it into a different folder.
You can also swipe left on the folder and tap the blue folder icon. Then simply select a new location.

 321w,
321w,  768w,
768w,  196w,
196w,  223w,
223w,  160w,
160w,  802w,
802w,  481w,
481w,  71w,
71w,  824w,
824w, 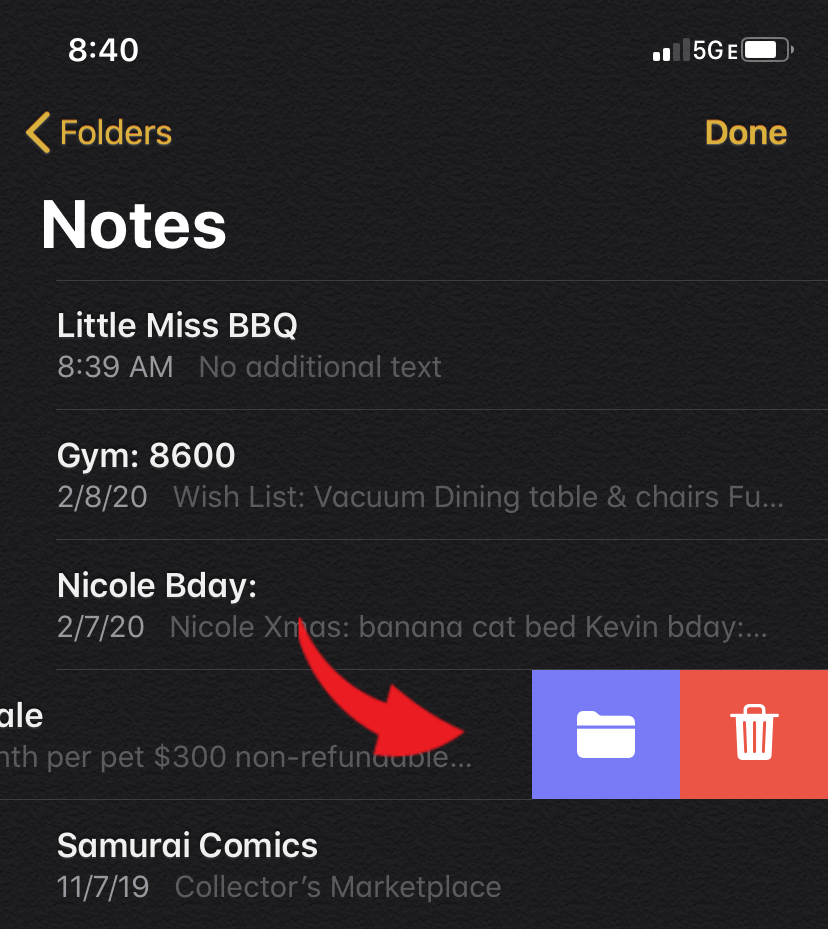 828w" data-sizes="(max-width: 487px) 100vw, 487px" />
3. Greater formatting options
The available formatting options for notes and checklists make it easy to indent text, create subheads and drag and drop checklist items.
Note: These formatting options are only available if you save your notes to iCloud. If your notes are attached to your email, these will not be available.
To indent text, tap Aa from the menu. Select the left indent on the right side of the sub-menu. For checklist items, swipe each to the right. To remove the indent, swipe left.
If you want to create a subheading in a note, go to the end of the section, you want to change and select Aa from the menu. Choose Subheading. In addition, you have options that include: Bold, Italic, Underline or Strikethrough.
Another new feature is the ability to drag and drop checklist items. To perform this task, simply press down on the item and drag it to a new location in the checklist.
4. Add notes with Siri
Looking for a hands-free way to craft a new note? Ask Siri. All it takes is for you to say, “Hey Siri, take a note.” Dictate your note and the smart assistant will read it back to you and insert a text version into your Notes app. Tap or click to control your iPhone with your voice (and leave Siri out of it).
5. Share a folder
While the ability to share individual notes is not a new feature, with iOS 13, you can now share an entire folder with anyone. To share a folder, swipe left and tap on the Add People icon.
 220w,
220w,  413w,
413w,  297w,
297w,  132w" data-sizes="(max-width: 500px) 100vw, 500px" />
Select how you want to invite people. If you wish to share in a view-only mode select Share Options and check View only.
6. Protect with a password
For any note that contains sensitive information, you have the option to keep it safe with password protection.
To lock a note, go into the note you want to protect and tap the share icon in the upper right corner, then choose Lock Note. Once locked, you will observe a lock icon next to the note along with the last date it was edited. To unlock, enter your password. Tap or click to discover iOS security settings you should be using.
7. Pin a note
Over time, you may discover you often refer to a few notes over and over again. No need to search or sort through your notes collection, just pin the important ones. Doing so will place any pinned notes at the top. Swipe right on any note and tap the pin icon. Repeat process to unpin.
With a few of these tips and tricks, your Apple Notes experience will improve.
BONUS: Scan documents
Did you know you can scan documents right in your Notes app? While other phones might make you download an app for that, Apple has you covered. Simply tap the camera icon and select Scan Documents. Position your camera over the document and use the drag options to center the image.
Tap Done when you’ve completed your edits and now you have your document scanned to your Notes app. Easy, right?
I love using the notes! My stepdaughter sends me her birthday list and then whenever she adds something It updates for me which I think is so cool. I will also say I have every password for everything important that I need to log into on my notes so this is super useful to know that I can add a password to that file. If someone got ahold of my phone and went into my notes they would be able to get into pretty much everything personal
Apple notes is such a life savior for me. Nowadays it has gotten even more advanced and it is crazy (in a good way). The newest update allows you to scan documents into your notes, which makes them look cleaner than just taking a picture. You can also scan the text off of a document and it will copy the text from the document onto the note. It saves so much time and hassle. Apple notes have come a long way.
Believe it or not, apple notes might be one of my favorite and most used apps on my phone. I use the notes app for everything. It is very easy to use and easy to access. I can scan notes, invite anyone to the notes I have created, make folder for certain notes, etc.
I use my notes app really often actually. I use it to keep grocery lists, then i can share them with my roommate so we dont buy doubles of things. I can also scan documents and make edits to them if needed, really cool. If you didnt know you can also put passwords on specific notes, like if you store your passwords in one of the notes etc.
@keyonnastarksiectskin-com Yesss same here. I use apple notes for everything!
I love using the notes app in my phone. I use it to store my passwords, make list for stores, write my ideas and thoughts there, and for planning. I didnt know i can use it to scan documents and they could be shared.
@abigailcochraneiectskin-com I am happy to learn we can share notes with people that will totally help my mom and I when we dont shop together.
@keyonnastarksiectskin-com I agree I totally use the notes app more than any other feature on my phone. I will be using it even more now that I learned about so many other features.
I love using my notes for grocery list and any upcoming events so i dont forget. I had no idea it had all these extra features! thats so cool.
@abigailcochraneiectskin-com I guess i was the only one that didnt know you could scan stuff! Thats so cool and interesting.
@laurenjohnsoniectskin-com I also use my notes for all my passwords. They have been in there since i got my first iphone.
I always use my notes app. Whether it be for grocery shopping or just doing my to do list. When I was in the LPN program I took my class notes on my ipad in the notes app.
@abigailcochraneiectskin-com I had no idea that you could have your notes password protected. I don't often share notes but friends of mine have shared their notes with me when we are planning something.
@laurenjohnsoniectskin-com I keep most of my passwords in my apple notes so I can keep track of everything. It is absolutely a life saver.
I absolutely love my notes app. Since it is linked with my icloud I can write quick notes from my phone and it will link to my computer when I need it. I also use it for all of my passwords, lists, organization, etc. The notes app is so convenient especially since I tend to lose those small pieces of paper that I jot stuff down on.
@abigailcochraneiectskin-com Being able to scan documents on the app has been a lifesaver for me. It is so much easier to upload it right from your phone.
@laurenjohnsoniectskin-com I just found out recently that I could actually share my notes and it would update automatically. This came in handy for me during the holidays for Christmas lists.
I live by the Notes app, I make lists, have most of my personal information and passwords, and just notes for myself. I really like that you can have a password for the personal information, it feels more secure in case someone were to get a hold of my phone and somehow find all of my information. It also keeps me organized when I need to-do lists or anything of the sort.
@madisonmauldiniectskin-com I did too! I've always had a hard time giving lists to people around holidays/birthdays because I feel like it all has to be from the same place to have just one list lol
@paigebrickhouseiectskin-com I agree! Its so much easier to keep up with than a piece of paper
@camiryndavisiectskin-com I am the same way. I use my notes for everything. I love how handy they are when it comes to a conformation number when I'm on the phone or when I remember something and just put it right in my notes.
@camrynauxtiectskin-com Same. I love using my notes for lists. Especially for Christmas lists.
I love my apple notes! It is loaded with spa ideas and menu ideas, business ideas, passwords, scanned documents, appointment details, important reminders.
I use the notes app just about everyday. I type all my grocery lists on there, save all my passwords in a locked note, little things I need to remember, or just notes for myself. I especially use the "Hey Siri, take a note" all the time.
@camrynauxtiectskin-com Yes being able to lock a note with a password was a good update.
@megancumberiectskin-com I am a list maker that makes a list for a list. I have 9 zillion jobs, 8 billion extracurriculars, lists, passwords, song lyrics, quotes I want to remember lol....if it was not for NOTES where would my life be. I also love that they are available cross device. ie. Apple Watch, Macbook...etc. Love it 😍
Wow what a fantastic article! Kudos to whoever posted this. I love the notes app and use it alllll the time but now I have more tools in my toolbelt now. I use the locking method a lot for webstie passwords and logins. Theres a login for everything and I could never keep track of it. I am also very cautious and don't have google automatically keep my passwords for lots of things so this feature on the notes app is extremely helpful in my book.
@megancumberiectskin-com This article didnt cover it but theres even a way to have a more efficent grocery list on the notes app. When I remeber I use that trick but im just happy that im writing my list down and looking at it anyways.


